Introduction
PWM (Pulse Width Modulation) is a modulation technique by which the width of pulse is varied while keeping the frequency constant.
Through PWM technique, we can control the power delivered to the load by using ON-OFF signal.
The PWM signals can be used for applications such as controlling the speed of DC motors, changing intensity of an LED, controlling Servo motors, etc.
The GIF shown below depicts the use of PWM for intensity control of an LED.

Raspberry Pi has two PWM channels i.e. PWM0 and PWM1.
PWM pins for the two PWM channels on 40-pin P1 header are as follows:

The PWM pins on Raspberry Pi 40-pin P1Header is shown in below figure,
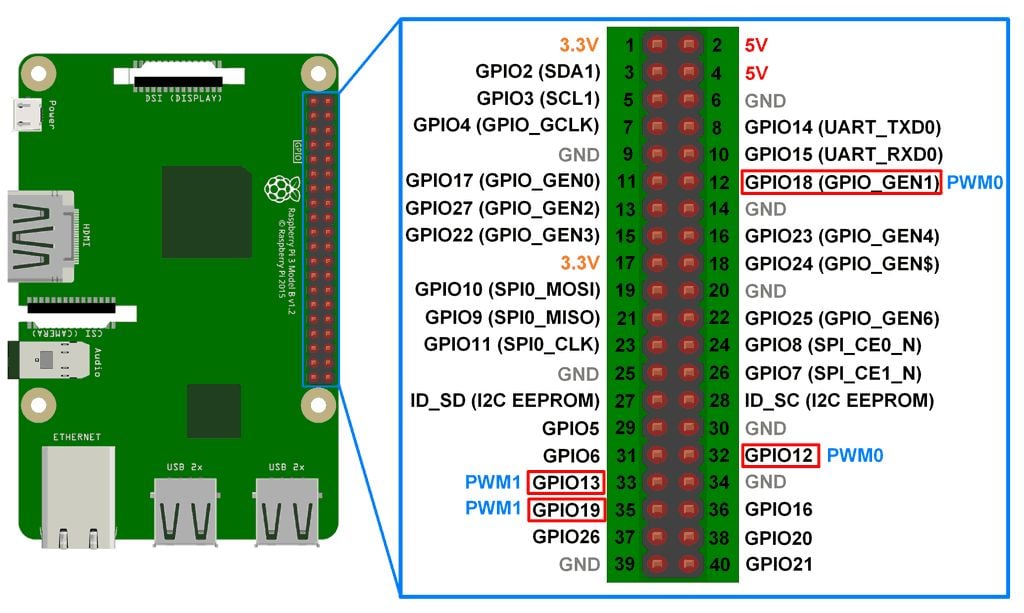
The PWM pins on Raspberry Pi are shared with audio subsystem. Thus, we can have either PWM output or Audio output.
Interfacing Diagram

Example
Here, we are going to generate PWM on Raspberry Pi. This PWM output is connected to an LED which will show change in intensity.
Let’s generate PWM using C and Python language.
Generate PWM using Python
The PWM generated by Python on Raspberry Pi is software PWM. This PWM has timing resolution of 1 us which is better than Software PWM generated using C (WiringPi library).
Python Program
import RPi.GPIO as GPIO
from time import sleep
ledpin = 12 # PWM pin connected to LED
GPIO.setwarnings(False) #disable warnings
GPIO.setmode(GPIO.BOARD) #set pin numbering system
GPIO.setup(ledpin,GPIO.OUT)
pi_pwm = GPIO.PWM(ledpin,1000) #create PWM instance with frequency
pi_pwm.start(0) #start PWM of required Duty Cycle
while True:
for duty in range(0,101,1):
pi_pwm.ChangeDutyCycle(duty) #provide duty cycle in the range 0-100
sleep(0.01)
sleep(0.5)
for duty in range(100,-1,-1):
pi_pwm.ChangeDutyCycle(duty)
sleep(0.01)
sleep(0.5)
PWM Functions in Python
Create PWM Object
Create an Object of class PWM which is a part of RPi.GPIO library. Here, we have created Object of name pi_pwm. We can provide any name for Object.
E.g.
pi_pwm = GPIO.PWM (Pin no., frequency)
Where,
Pin no. – PWM pin no on which PWM will be generated.
Frequency – frequency of PWM
Now, we can call PWM functions of RPi.GPIO library by using PWM object.
Note: The PWM which is generated here is Software PWM and can generate on any GPIO pin.
start (Duty Cycle)
It is used to start PWM generation of specified Duty Cycle.
ChangeDutyCycle(Duty Cycle)
This function is used to change the Duty Cycle of signal. We have to provide Duty Cycle in the range of 0-100.
ChangeFrequency(frequency)
This function is used to change the frequency (in Hz) of PWM. This function we have not used in above program. But, we can use it for changing the frequency.
stop()
This function is used to stop the PWM generation.
Generate PWM using C
Hardware PWM
We can also generate PWM on Raspberry Pi using program written in C. Here, we are using wiringPi library for PWM generation on Raspberry Pi using C. It provides access to the hardware PWM of Raspberry Pi.
C Program
#include
#include
#include
const int PWM_pin = 1; /* GPIO 1 as per WiringPi, GPIO18 as per BCM */
int main (void)
{
int intensity ;
if (wiringPiSetup () == -1)
exit (1) ;
pinMode (PWM_pin, PWM_OUTPUT) ; /* set PWM pin as output */
while (1)
{
for (intensity = 0 ; intensity = 0 ; –intensity)
{
pwmWrite (PWM_pin, intensity) ;
delay (1) ;
}
delay(1);
}
}
PWM Functions in C (WiringPi)
pwmWrite (PWM pin, PWM value)
where,
PWM pin – On-chip PWM Pin no. on which PWM is to be generated.
PWM value – value to be written in PWM register for PWM generation. This value is in the range of 0-1023.
We can generate PWM on Raspberry Pi using analogWrite() function like Arduino function. But to use this function we have to include some extra modules.
pwmSetClock (divisor)
This function is used to set the divisor for PWM Clock.
pwmSetMode (mode)
mode – PWM generation can be done in two modes i.e. Balanced and Mark:Space mode. We can provide parameter to select above mode as, PWM_MODE_BAL or PWM_MODE_MS. The default PWM mode on Raspberry Pi is Balanced mode.
pwmSetRange (range)
This function is used to set the range for PWM generation in PWM generator register. The default range is 1024.
Software PWM using C
We can generate PWM on every GPIO pin of Raspberry Pi using Software PWM library of wiringPi.
Here, we will change the intensity of LED using software PWM on Raspberry Pi.
Program
#include /* include wiringPi library */
#include
#include /* include header file for software PWM */
int main(){
int PWM_pin = 1; /* GPIO1 as per WiringPi,GPIO18 as per BCM */
int intensity;
wiringPiSetup(); /* initialize wiringPi setup */
pinMode(PWM_pin,OUTPUT); /* set GPIO as output */
softPwmCreate(PWM_pin,1,100); /* set PWM channel along with range*/
while (1)
{
for (intensity = 0; intensity = 0; intensity–)
{
softPwmWrite (PWM_pin, intensity);
delay (10);
}
delay(1);
}
}
Functions Used
To generate Software PWM using wiringPi library, we have to include softPwm.h header file.
softPwmCreate (Pin no., initial value, PWM Range)
This function is used to create software controlled PWM. We can generate PWM on any of the GPIO pin.
Parameters:
Pin no. – GPIO pin on which we want to generate PWM.
Initial value – specify any initial value which is in between PWM range.
PWM range–we can provide range i.e. frequency range for PWM. Use 100 for the PWM range then the value can be anything from 0 to 100. These values are useful to generate PWM of various Duty cycle.
Note: The minimum pulse width is 100 us to maintain low CPU usage. For this minimum pulse width, suggested PWM range is 100 which gives 100 Hz frequency. If we lower the value of PWM range then we will get higher frequency with less resolution. Or we can increase the value of PWM range, and then will get lower frequency with better resolution.
softPwmWrite(Pin no., value)
This function is used to change the value of PWM on PWM pin.
Pin no. – GPIO pin on which we want to generate PWM.
value – value is PWM value.
Software PWM or Hardware PWM
When we have to generate more number of PWM and our application is low timing resolution tolerant, then we can use Software PWM.
But if our application needs higher timing resolution PWM, then we need to use Hardware PWM.
