Introduction
Azure is a cloud computing service by Microsoft which is widely used for building, testing, deploying and managing applications and services through a global network of data centers that are managed by Microsoft.
Azure IoT hub is a cloud service that enables bidirectional communication between devices. This service can be used for connecting various systems to the cloud and provides means of control and measurement of the systems.
It can be used in various systems like home automation systems, greenhouse monitor and control systems, etc.
For example, we can monitor the status of lights and fans in our homes from a remote place. We can also monitor if the house is vacant or not using data from some sensor like a PIR sensor. Based on this data from PIR sensor, we can control the lights and fans by sending data to the system remotely.
Let’s build an application in which we will collect Temperature and Humidity data and send them to an Azure IoT hub.
Here, we will be using NodeMCU as an IoT device which will collect data (temperature and humidity) from DHT11 sensor and transmit this data along with additional data (such as device ID, time, etc.) to an IoT Hub on Microsoft Azure using the MQTT protocol. The NodeMCU will use internet through a local WiFi connection.
So basically, we will need the following in order to proceed:
1. A NodeMCU device.
2. DHT11/DHT22 sensor. (We can also simulate the sensor data, so it is fine even if you do not have the sensor)
3. An IoT Hub in a Microsoft Azure account.
4. A WiFi router connected to the internet.
If you do not already have a Microsoft Azure account, you can refer the topic Microsoft Azure Free Sign-Up in the Getting Started section of Microsoft Azure.
If you have not created an IoT Hub already, you can refer the topic Creating an IoT Hub in Microsoft Azure in the Getting Started of Microsoft Azure.
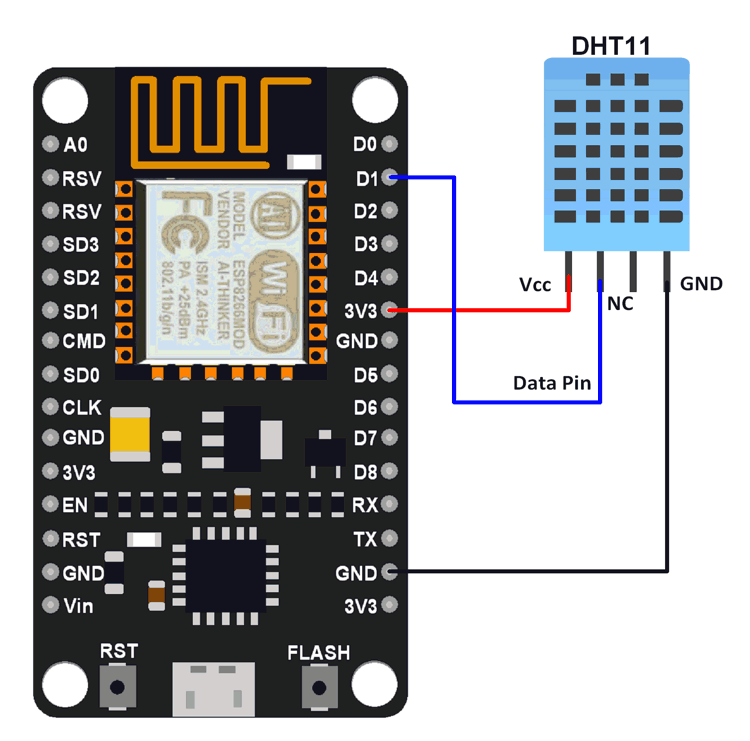
Interfacing Diagram
We will be using the NodeMCU with the Arduino IDE. You will need to setup the Arduino IDE for NodeMCU by installing the ESP8266 package and ESP8266 boards in the Arduino IDE before you can proceed further.
To set up the Arduino IDE for NodeMCU, refer the topic Getting Started with NodeMCU using Arduino IDE in the Basics using Arduino IDE section of NodeMCU.
Once you have installed the ESP8266 packages and boards in the Arduino IDE, install the following libraries in the Arduino IDE :
- AzureIoTHub
- AzureIoTUtility
- AzureIoTProtocol_MQTT
- ArduinoJson
- DHT sensor library
- Adafruit Unified Sensor
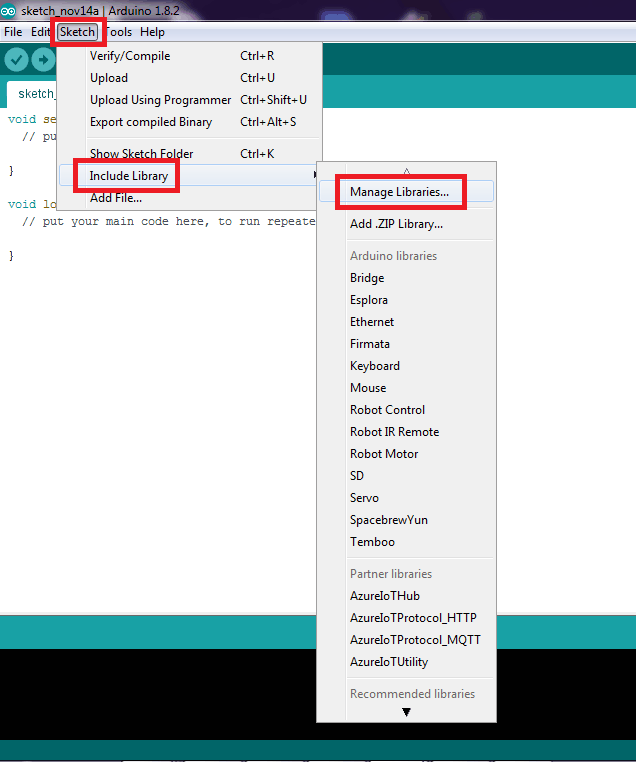
In order to install these libraries, open the Arduino IDE, click Sketch –> Include Library –> Manage Libraries …
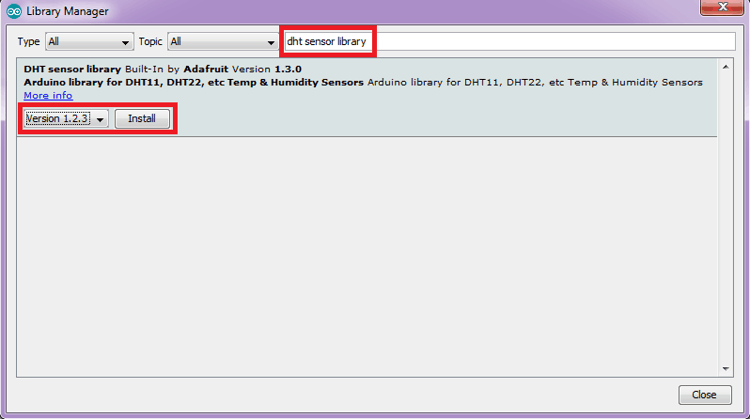
In the window that will open, type the name of the library and click install. Install the latest versions of the library.
Images given below will help you understand how to install libraries.
Now that we have the Arduino IDE set up and the required libraries installed, we can proceed to the application (code) that we will be using to send data to the IoT Hub.
We will be using a sample application by Azure. This application is for the Feather Huzzah (an ESP8266 board by Adafruit) but can be used for the NodeMCU as well. A few modifications to the application code are required which will be explained when we come to that part.
This code is available on GitHub. The link to the GitHub page of this code is given in the See Also section of this page which is located at the end of the page.
You can download the code from here.
We have kept the modified code in the attachments section of this page. You can directly download the modified code or can use the above link to download the original code and make the modifications that will be mentioned below.
Extract the original code from its zip file to some location of your choice. There will be a folder named app in the extracted folder. Open the Arduino IDE and open the file named app.ino from the app folder. You will find 6 files (app,config.h, credentials, iothubClient, message and serialReader) opened in the Arduino IDE.
Modifications to application code
1. In the file config.h, find #define DHT_TYPE DHT22. If you are using DHT11, change DHT22 in the define statement to DHT11; else if you are using DHT22, keep it as it is.
2. In the file config.h, change #define DHT_PIN 2 to #define DHT_PIN D1.
You could keep this statement as it is and instead connect DHT data pin to D2 instead of D1.
3. If you do not have a DHT sensor, you can simulate the DHT sensor data. In the file config.h, find #define SIMULATED_DATA false and replace it by #define SIMULATED_DATA true.
4. In the file config.h, find #define DEVICE_ID "Feather HUZZAH ESP8266 WiFi" and replace it with #define DEVICE_ID "NodeMCU".
5. Increase the delay in the void loop of app.ino from delay(10) to delay( 5000).
Now, in the Arduino IDE, go to Tools –> Board –> NodeMCU 1.0
NodeMCU 1.0 will be located under ESP8266 Modules (You will have to scroll down from Arduino AVR Boards to see the ESP8266 Module Boards).
Now connect the NodeMCU to your Laptop/PC and select the appropriate port in the Arduino IDE.
Upload the app.ino to the board.
Open the Serial Monitor of Arduino IDE, Select 115200 as the baud rate and No line ending.
Enter the following information through the Serial Terminal:
- SSID of your WiFI network.
- Password of your WiFi network.
- Connection String-Primary Key of your Device.
Refer the topic Creating an IoT Hub in Microsoft Azure in the Getting Started section of Microsoft Azure to know what the Connection String-Primary Key for your device is.
Note : Enter the Connection String-Primary Key for the Device(not of the iothubowner).
This information is stored in the EEPROM of NodeMCU ESP8266.
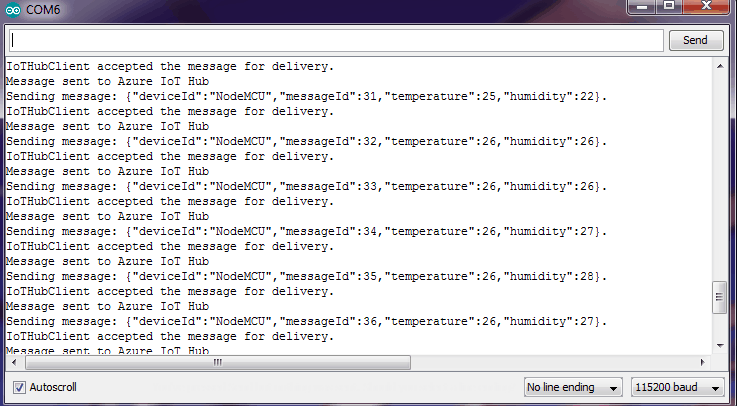
Every time the device is reset (or powered on), you will see the line Do you need to re-input your credential information?(Auto skip this after 5 seconds)[Y/n] on the serial monitor. If you want to change the credentials (use a different WiFi / password of WiFi has been changed / change device), type Y in the serial monitor (within 5 seconds of seeing the msg). Then you will be asked to enter the credentials again.
Once you have entered the correct credentials, you will see output similar to that shown in the image below.
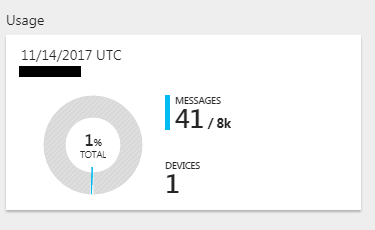
Now, if you go to your IoT Hub on Microsoft Azure, you will see the change in Usage graph. Initially, there would be 0 messages and after sending the messages, you will see the number of messages that have been received by the IoT Hub.
The free IoT Hub has a limit of 8000 messages per day. That is why we increased the delay in the application code.